OpenMTC Deployment
How to initialize OpenMTC for development?
This step-by-step tutorial assumes you have Ubuntu -- or any other Debian-based Linux distribution -- installed. Particularly, this guide works best with Ubuntu 16.04, Ubuntu 14.04 or Debian Jessie.
Your OpenMTC development setup may be based on running OpenMTC components with: * Docker (recommended) * purely based on Python
How to setup a development environment using Docker?
Note: If you do not have a running docker setup, we provide a docker installation guide. Alternatively you can use the official docker documentation.
For this scenario, be sure to build Docker container images for following OpenMTC components:
- sdk
- gateway
- backend
Building Docker container images for OpenMTC components
For the following, it is expected that the OpenMTC code repository is prepared in a directory named:
OpenMTC
OpenMTC container images will be created through a hierarchy of dependent images. For example when creating image 'sdk', a dependent 'base' image will be created. After completing the build process for each Docker image, the image is to be found in the machine's local Docker repository.
Be sure to have installed Docker.io in version 1.6.2 at minimum.
cd OpenMTC
./create-binary-docker sdk
./create-binary-docker gateway
This will create Docker image for the machine's architecture and store them in the local Docker repository. These freshly generated Docker images will have names dependent on your architecture.
Crossbuilding OpenMTC Docker container images
Similarly to the last subsection, it is possible to crossbuild, for
example, Docker images for ARM on an AMD64 machine. Therefore, an
additional parameter needs to be provided to the
create-binary-docker script.
cd OpenMTC
./create-binary-docker --arch arm sdk
./create-binary-docker --arch arm gateway
Again, all freshly generated images are stored in the machine's local Docker repository. Note that these images will hold "/arm" in their names.
It is possible to export these newly created Docker images and make them available to the target machine, by import.
For a description on how to save newly created Docker
images, see:
How to save crossbuild Docker images.
For a description on how to load a saved Docker image, on the target
machine, see:
How to load saved Docker images.
How to inspect freshly generated Docker images
TODO
How to save crossbuild Docker images
Disclaimer: Docker provides commands like export/import and
save/load. Sadly, it is easy to get confused here. The command
save is used to export a Docker image, while the command load is
used to import this Docker image. Whereas, the commands export/import
are to container instances.
Assuming that the Docker images for OpenMTC Gateway and Backend are
named as openmtc/gateway-arm and openmtc/backend-arm, it is
possible to store these two images in one file, by using the
following:
# Assuming this to be executed on the crossbuild host machine

# Additionally assuming, you have enough file space in /tmp available
cd /tmp

docker save -o openmtc-docker-images.tar openmtc/gateway-arm  openmtc/backend-arm
How to load saved Docker images
After you have copied the tar file that stores the above mentioned Docker images to the destination machine, use the following command to load them into the local Docker repository of the destination machine.
# Assuming this to be executed on the crossbuild target machine

# Additionally assuming, the tarfile was copied to /tmp directory
cd /tmp

docker load -i openmtc-docker-images.tar
OpenMTC development setup, for field domain only
The following figure describes a simple OpenMTC development setup. All data entities within a oneM2M system are represented as resources. All resources are hierarchical ordered within the resource tree. For this simple OpenMTC development setup, it is assumed that all resources from the Application Entity (AE) will be accessible via the OpenMTC Gateway. This means that the whole setup is placed in field domain only. Via the external REST API, a user is able to adjust the resource tree by using an HTTP client.
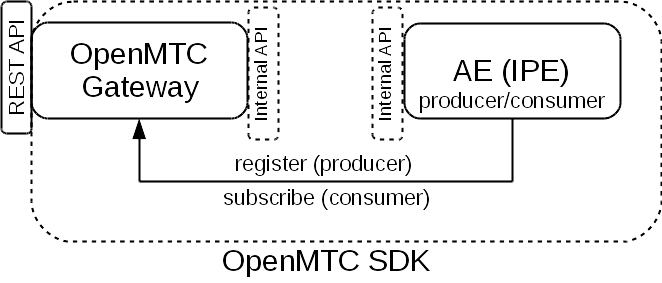
In the figure above, it is also shown that a developer will use the OpenMTC SDK to provides her own Application Entity (AE). This user-defined application entity is able to access functionality of the OpenMTC Gateway by using the SDK's internal API.
A developer that wants to develop an AE may use this simplified development setup. Therefore, the developer will need to run an OpenMTC Gateway. This can be achieved easily by using the prepare Docker images:
docker run -d --name gateway  -p 0.0.0.0:8000:8000  -e "EXTERNAL_IP=<EXTERNAL_IP>"  \
    -e "LOGGING_LEVEL=DEBUG"    openmtc/gateway-arm -vv
- If you need to make the OpenMTC Gateway accessible to outside of
your host machine, use
<EXTERNAL_IP>to configure this. - Note that the Docker image name
openmtc/gateway-armmay vary on your machine. Usedocker imagesto identify the Docker image name you need to use here. - If you need to know more about detail of
-d(detach) and the port mapping configuration-p 0.0.0.0:8000:8000, check out the documenation as provided by Docker.
If you already want to start with OpenMTC development, jump to How to test your development setup?.
OpenMTC development setup, for infrastructure domain
The following figure depicts a more complex setup of OpenMTC. Here, the focus on AE development for infrastructure domain. The following figure depicts this setup.
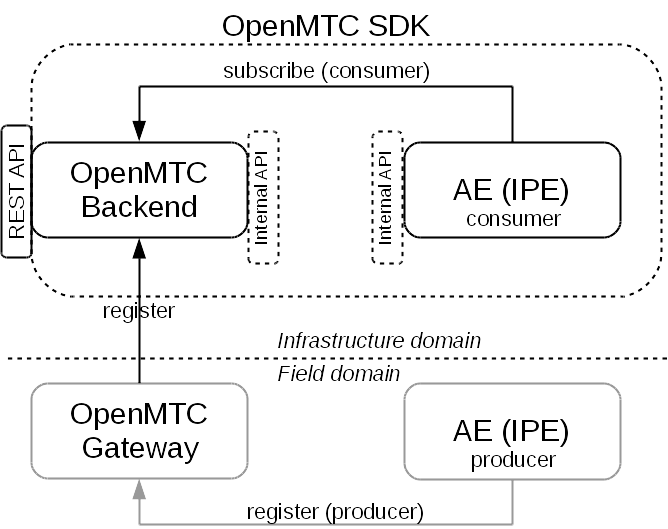
Here, the simple setup from the last subsection is extended. An AE in the field domain acts as a producer of data. Within this example, another AE is developed that acts as data consumer in the infrastructure domain. Therefore, an OpenMTC Backend will be used by the AE in infrastructure domain, to subscribe to the data from the field domain.
For this setup the developer will need to provide,
- An OpenMTC Backend
docker run -ti --name backend -p 0.0.0.0:18000:18000 -e "ONEM2M_CSE_ID=<CSE_ID>" \ -e "ONEM2M_NOTIFICATION_DISABLED=false" openmtc/backend-arm -v <CSE_ID>: TheCSE_IDof the Backend (e.g.backend)- An OpenMTC Gateway (note that this configuration is different to
the one from the last example, due to the connection to the OpenMTC
Backend)
docker run -d --name gateway -p 0.0.0.0:8000:8000 -e "EXTERNAL_IP=<EXTERNAL_IP>" \ -e "ONEM2M_HTTP_TRANSPORT_PORT=8000" -e "ONEM2M_CSE_ID=<CSE_ID>" \ -e "ONEM2M_REMOTE_CSE_POA=<POA>" -e "ONEM2M_REMOTE_CSE_ID=<REMOTE_CSE_ID>" \ -e "ONEM2M_NOTIFICATION_DISABLED=false" -e "ONEM2M_REGISTRATION_DISABLED=false" \ openmtc/gateway-arm -v - IP configuration:
<EXTERNAL_IP> <CSE_ID>: TheCSE_IDof the Gateway (e.g.gateway)<REMOTE_CSE_ID>: TheCSE_IDof the Backend (e.g.backend)<POA>: An URL that describes the POA fo Backend (e.g. "http://localhost:18000")- If you need to know more about detail of
-d(detach) and the port mapping configuration-p 0.0.0.0:8000:8000, check out the documentation as provided by Docker.